Warning: Undefined variable $post_id in /data/www/wwwroot/blog.ymypay.cn/wp-content/plugins/wp-baidu-record/wp-baidu-record.php on line 56
laf云函数续费
前言
laf默认免费机器只支持1个月,后续需要手动点击续费按钮,这让生产环境十分不方便,于是有了laf自动续费
项目地址:https://github.com/2331892928/laf_xf
抓包工具
laf.dev目前(2023年3月20日没有进行参数加密) 可通过浏览器抓包
浏览器控制台(网络页)勾选保留日志
laf.dev抓包介绍
登陆包
浏览器输入 https://laf.dev 进入登陆页面,如已登陆,退出后进入登陆页面
完全进入登陆页面后按(F12或ctrl+shift+i) 进入控制台,点击进入网络(Network页)
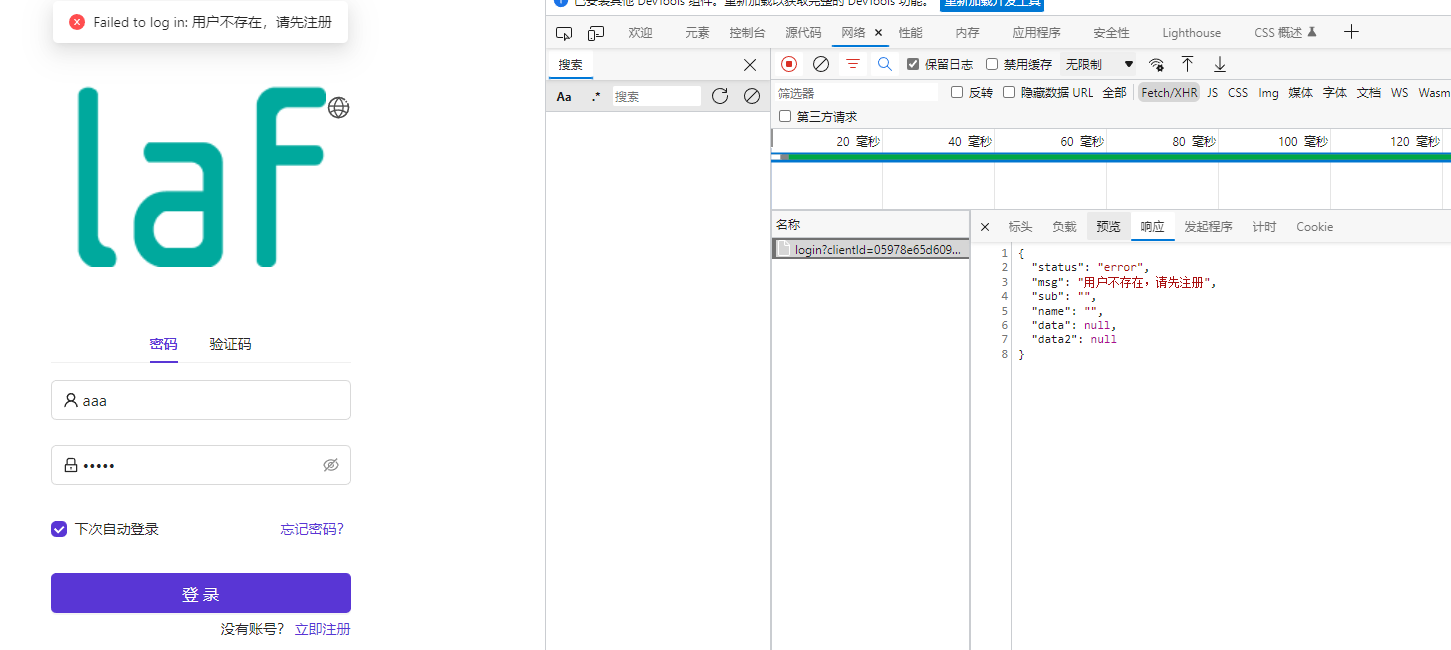
然后登陆即可看到登陆包


右键复制链接地址,我们可以看到地址为:https://login.laf.dev/api/login?clientId=05978e65d609e83258ce6&responseType=code&redirectUri=https://laf.dev/login_callback&scope=openid,profile,phone,email&state=casdoor&nonce=&code_challenge_method=&code_challenge=
请求为:Content-Type:application/json
post请求
请求参数为:
{
    "application": "laf",
    "organization": "laf",
    "username": 账号,
    "password": 密码,
    "autoSignin": true,
    "type": "code",
    "phonePrefix": "86",
    "samlRequest": ""
}
失败返回:
{
  "status": "error",
  "msg": "失败原因",
  "sub": "",
  "name": "",
  "data": null,
  "data2": null
}
成功返回:
{
  "status": "ok",
  "msg": "",
  "sub": "",
  "name": "",
  "data": "成功返回的code值",
  "data2": null
}
可以看到成功登陆则返回code值,此值有用,通过此值获取authorization(账号授权码,相当于cookie) 然后确保控制台不关闭,不清空日志
获取authorization
输入正确账号密码,再抓一次,你会发现成功进入laf.dev应用中心,此时会发现多了几个包
点开如图所示的包信息,会发现这个包就是获取authorization的


右键复制链接地址,最终的包为:https://laf.dev/v1/code2token?code=code值
get请求
Content-Type:application/json
成功返回:
{
    "error": null,
    "data": "xxxxx"
}
data里的值也有用,最终组成请求头:
{
    "Content-Type": "application/json",
    "authorization": "Bearer " + authorization值
}
续费包
清空网络页地址,在laf.dev点击续费按钮,可以发现续费包


其中的参数id为服务器id,不是服务器appid
右键复制链接地址:https://laf.dev/v1/subscriptions/服务器id/renewal
post请求,请求头为获取authorization之后的请求头,参数为
{
    "id": 服务器id,
    "duration": 2678400
}
通过laf云函数写定时续费
添加一个函数,函数名随意,然后点击确定

创建axios
import cloud from '@lafjs/cloud'
import Axios from 'axios'
export async function main(ctx: FunctionContext) {
  const axios = Axios.create({
  })
  // axios拦截器,直接拦截返回错误参数
  axios.interceptors.response.use(
    response => {
      return response
    },
    error => {
      if (error.code === 'ECONNABORTED' || error.message.indexOf('timeout') !== -1 || error.message === 'Network Error') {
        return Promise.reject(error)
      }
      if (error.response.status!=200){
        return retjson(error.response.status,error.response.statusText)
      }
    }
  )
}
登陆函数
  function login(username:string,password:string){
    return axios({
      url:"https://login.laf.dev/api/login?clientId=05978e65d609e83258ce6&responseType=code&redirectUri=https://laf.dev/login_callback&scope=openid,profile,phone,email&state=casdoor&nonce=&code_challenge_method=&code_challenge=",
      method:"POST",
      responseType:"json",
      data:{
        application: "laf",
        organization: "laf",
        username: username,
        password: password,
        autoSignin: true,
        type: "code",
        phonePrefix: "86",
        samlRequest: ""
      }
    })
  }
获取authorization函数
  function get_authorization(d:string){
    return axios({
      url:"https://laf.dev/v1/code2token?code=" + d,
      method:"GET",
      responseType:"json",
    })
  }
续费函数
  function xf(id:string,authorization:string){
    return axios({
      url:"https://laf.dev/v1/subscriptions/" + id + "/renewal",
      method:"POST",
      responseType:"json",
      data:{
        id: id,
        duration: 2678400,
        // 2678400
      },
      headers:{
        authorization:authorization
      }
    })
  }
环境变量
将服务器id,用户名,用户密码存放进环境变量方便调用,成功创建后点击更新重启即可

最终成品
各种函数都写出来了,就看自己发挥了,当然有成品:https://github.com/2331892928/laf_xf
设置定时任务
点击触发器,新建触发器

输入自定义名称,点击关联函数绑定到laf自动续费的函数,输入cron表达式即可点击新建
微信扫描下方的二维码阅读本文


